3. React
Assignment Links
- Starter Code
- Finished Solution (what you will build)
- Lecture 3: React Basics
- Lecture 4: React State and Context
Make sure to watch both lectures before attempting the assignment!
Assignment Overview
Almost as classic as writing a "Hello World!" program for a new programming language, building a Todo list is a rite of passage for all budding developers. Still, it provides a fantastic opportunity to learn the basics of state management and composing components in React.
First, take a look at the deployed solution to get a sense of what we will build. First, we will build a todo list that allows users to add, complete, and delete tasks. Then, we will refactor the code to use Context to simplify our state management. And finally, we will persist the state using local storage.
Setup
Install the dependencies:
bun install
Start the development server:
bun dev
And then view the starter code at http://localhost:5173/
The project is mostly is empty. First, create a components/ directory within the src/ directory to store the components we will create. Then, create a TodoList.tsx file within the components/ directory to start building the app. Later, we will use a separate TodoItem.tsx component to render each individual todo item after it has been created.
Part 1: Creating Todo Items
Part 1.1: Defining the Task Type
It always make sense to start a project by thinking about the data you will work with, and what shape it should take. In this case, there is only one data type we need to define, and that is our Task type. In taskTypes.ts, create an export an object type Task to represent a todo item. Think about the following when defining the properties of a Task:
- What data about a task is visually displayed to a user?
- Is all of this data required, or should any of it be optional?
- How will we uniquely identify each task?
After defining your Task type, check your definition with the staff solution below.
Solution
export type Task = {
  id: string;
  taskName: string;
  deadline?: number;
  completed: boolean;
};
Considerations:
- We can't use the task name to uniquely identify a task. Also, the index of the task within a list is not a reliable identifier, as it can change when tasks are added or removed. Therefore, we need a unique
idproperty for each task. - The
deadlineis optional because not all tasks have a deadline. If a task has a deadline, it should be a positive integer representing the number of days until the deadline. - Both the deadline and the id could either be strings or numbers, but we will use a string id and a number deadline for consistency.
Part 1.2: Getting User Input
In TodoList.tsx, create a form with two inputs, and a submit button. The inputs should either have labels that describe what they are for, or placeholders that indicate what should be entered.
Each input should have its value stored in state, and an onChange handler that updates the state when the input changes.
Hint: onChange handlers
A simple mapping of an input to a state value can be accomplished by setting the new value of the state to e.target.value in the onChange handler.
const [newTaskName, setNewTaskName] = useState<string>("");
<input
  type="text"
  placeholder="Enter a task"
  name="task"
  value={newTaskName}
  onChange={(e) => setNewTaskName(e.target.value)}
  required
/>
Check that your form is correctly storing updates to state by rendering the value of the input fields below the form and testing that it updates as you type.
<p>Task Name: {newTaskName}</p>
Export the component and render it in App.tsx to see the form in action.
Part 1.3: Adding a Task
Create another state object todoList to store an array of tasks. Make sure you type it correctly using the Task type you defined earlier.
Create a function addTask that takes the task name and deadline as arguments, and adds a new task to the todo list by updating the todoList state. Add an onClick handler to the submit button that to call addTask.
To get a unique id for each task, you can use the uuid npm package. These uuids will be unique.
import { v4 as uuidv4 } from 'uuid';
uuidv4(); // => '9b1deb4d-3b7d-4bad-9bdd-2b0d7b3dcb6d'
After you have updated the todoList state, what else should you do to ensure the form is ready for the next task to be added?
How can you ensure that the form is not submitted if the task name is empty?
Make sure to test that the addTask function is working correctly by adding a few tasks and checking that they are displayed below the form by JSON stringifying the todoList state.
<p>{JSON.stringify(todoList)}</p>
Part 2: Rendering Todo Items
Our TodoList.tsx component is already getting cluttered, and creating the todos and rendering them represents a logical separation of concerns that makes sense to be handled in different components. Create a new TodoItem.tsx component within the components/ which will be responsible for an individual todo item.
Since we are rendering the TodoItem component as a child of the TodoList component, we want to keep all of our state hoisted in the TodoList component. The TodoItem component will not store any of its own state, and instead will receive state and event handlers from its parent component as props.
Part 2.1: Defining the TaskItem Props
Take a look at the todo items in the deployed solution. What information about a task is displayed in each todo item? What actions can be taken on a task? With this in mind, define a the props for the TodoItem component in TodoItem.tsx.
Hint 1: Breaking Down the Data
If you are unsure about what props are needed, consider breaking it down into the data that is needed for display, and the actions that can be taken on the task.
The data is just going to be a Task object, but the actions are going to be functions that can be called when a user interacts with the task. What two actions can be taken on a task? What data do these actions need to take in as arguments to identify the task they are acting on?
Solution (check before moving on)
type TodoItemProps = {
  task: Task;
  handleCompleteTask: (taskNameToComplete: string) => void;
  handleDeleteTask: (taskNameToDelete: string) => void;
};
Our two event handlers should take in the task id. They are updating state, so they should not return anything.
Part 2.2: Rendering the Task
Based on the data passed in to the TodoItem component, render the task name, deadline, and a checkbox to indicate whether the task is completed. Make sure it is clear what each piece of data you are rendering represents.
To add the strike-through effect to the task name when it is completed, you can use the textDecoration CSS property. This property can be set to line-through to add a line through the text, and none to remove it.
<span style={{ textDecoration: condition ? "line-through" : "none" }}>
    {/* Text */}
</span>
The task deadline is an optional property. Use conditional rendering to make sure that any text labeling the deadline is only displayed if the deadline is defined.
Rendering a Checkbox
A checkbox can be rendered by passing type="checkbox" to an input element. The checked attribute controls whether the checkbox is checked or not.
<input
  type="checkbox"
  checked={true}
/>
Make sure that the TodoItem component is working correctly by rendering it in the TodoList component with some dummy data.
Part 2.3: Event Handlers and Rendering the List
Bind the passed in event handlers to the checkbox and delete button. The checkbox should call the handleToggleCompleteTask function when it is clicked, and the delete button should call the handleDeleteTask function. Both of these functions should pass in the task id as an argument.
In TodoList.tsx, create the handleToggleCompleteTask and handleDeleteTask functions. These functions should update the todoList state by toggling the completed property of the task with the given id, and removing the task with the given id, respectively.
Hint: Deleting an item
This can be done by filtering the todoList state to remove the task with the given id.
Hint: Toggling a checked item
This can be done by mapping over the todoList state and only changing the task with the given id. To set the completed property to the opposite of its current value, you can use the ! operator. Ensure that no other properties of the task are changed.
Finally, render a list of TodoItem components in the TodoList component. Make sure that the TodoList component is passing the correct props to each TodoItem component. Congrats! You now have a working todo list.
Hint: Rendering the list
You can map over the todoList state to render a TodoItem component for each task. Make sure to pass in the correct props to each TodoItem component.
Part 3: Refactor to Use Context
Our todo list is rather simple, and we only have to pass state and event handlers down one level. However, any app even slightly more complex than ours will quickly become unwieldy if we have to pass state and event handlers down multiple levels. Context is a way to share state and event handlers across multiple child components without having to pass them down through props.
Part 3.1: Creating the Context Type
Open TodoContext.tsx in the src/providers/ directory. Notice that we have two defined exports:
TodoProviderwill wrap our application and hold the state and event handlers that we want to access in any child component. Any child component wrapped by theTodoProviderwill have access to the state and event handlers.useTodois a custom hook that will allow us to access the state and event handlers stored in theTodoProviderfrom any child component. In addition to removing the need to pass props down through multiple levels of components, this hook allows us to only modify our state in predefined ways, making our code easier to read and maintain.
Fill in the TodoContextType to define what state and event handlers will be available through the useTodo hook. Think about what state in our application is needed in both the TodoList and TodoItem components. What are the three different places / ways we mutate this state?
Hint: What are the three event handlers we written so far?
Check your solution before moving on to the next step.
Solution
type TodoContextType = {
  tasks: Task[]; // The list of tasks
  // Add task to the list needs the task name and deadline
  addTask: (task: Omit<Task, "id" | "completed">) => void;
  deleteTask: (id: string) => void;
  toggleCompleteTask: (id: string) => void;
};
It doesn't make sense to store the state of the task name or deadline inputs in context, since they are only needed locally in the TodoList component.
Part 3.2: Implementing the Context and Deleting Props
Fortunately, we have already written all of the state logic for our todo list. All we need to do is move this logic into the TodoProvider component.
- Move the
todoListstate and theaddTask,deleteTask, andtoggleCompleteTaskfunctions into theTodoProvidercomponent. - Import the
TodoProvidercomponent intoApp.tsxand wrap theTodoListcomponent with it. - Import the
useTodohook intoTodoList.tsxand use it to access thetasksstate and theaddTaskfunction.
Now, instead of declaring the todoList state and the event handlers in the TodoList component, we can use the useTodo hook to access them.
const { tasks, addTask } = useTodo(); // addTask will be a function
Finally, remove the passed in handleToggleCompleteTask and handleDeleteTask props from the TodoItem component, and replace them with the toggleCompleteTask and deleteTask functions from the useTodo hook. The TodoItem will still need to take in the task prop to determine which task to render.
Our refactored code now has the same functionality, but a much cleaner structure.
- Our complex state management is handled in its own file, reducing the complexity of our
TodoListcomponent. - We now have two fewer props to pass to our
TodoItemcomponent, making it easier to read and maintain. - Future components that need access to the same global state can easily access it by importing the
useTodohook.
Part 4: Persisting State in Local Storage
As a final quality of life improvement, our todo list would be much more useful if it persisted our information even when refreshing the page. For an app as simple as ours, the browser provides a perfect solution, local storage.
The browser's local storage is a key-value store that persists data for a given domain.
localStorage.setItem("myKey", "myValue");
localStorage.getItem("myKey"); // => "myValue"
localStorage.removeItem("myKey"); // Removes the key-value pair
Local storage is limited to storing strings, but we can get around this by using JSON.stringify and JSON.parse to convert our objects to strings and back.
const tasks = [{ id: "1", taskName: "Do the dishes", deadline: 3, completed: false }];

// Store data
localStorage.setItem("tasks", JSON.stringify(tasks));

// Retrieve data
const storedTasks = JSON.parse(localStorage.getItem("tasks")) as Task[];
We could manually update our local storage in every event handler, but this would be repetitive and cumbersome. Instead, we can use the useEffect hook to automatically listen for changes to tasks and update local storage whenever our tasks state changes.
Part 4.1: Saving State to Local Storage
In the TodoProvider component, use the useEffect hook to save the tasks state to local storage whenever it changes. This will ensure that our tasks are saved even when the page is refreshed.
Make sure to define the dependencies for when this effect should run.
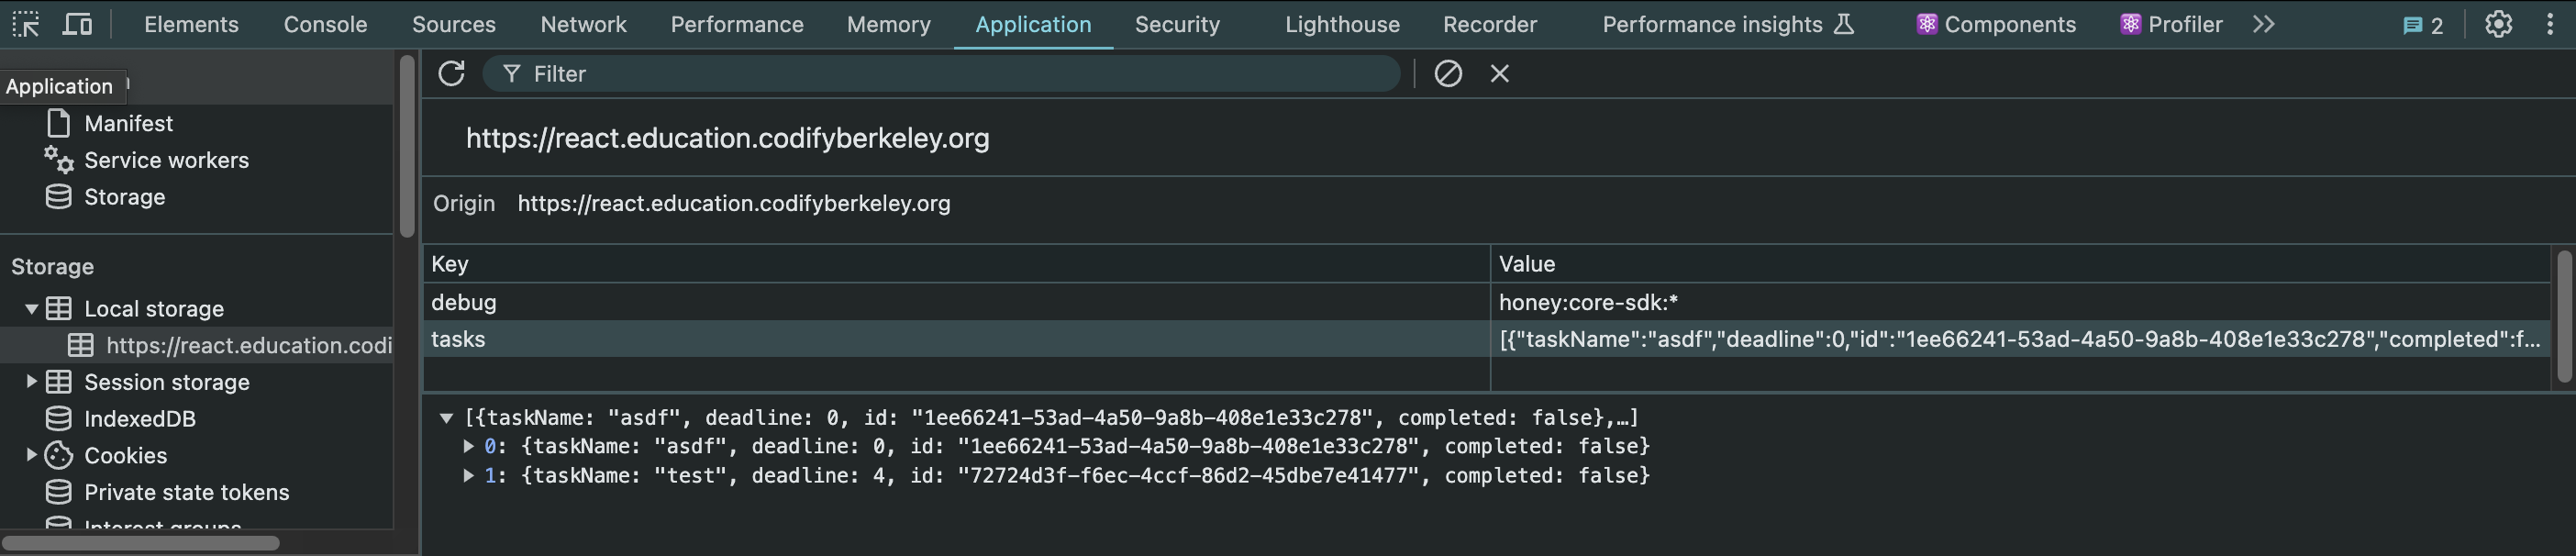
To test that your tasks are being saved, add some tasks, and then pull up the browser's developer tools to inspect the local storage. You should see a key-value pair for tasks with the stringified version of your tasks.
- Right click on the page and select "Inspect" or press
Ctrl + Shift + I. - Go to the "Application" tab.
- On the left side, you should see a "Local Storage" section. Click on it to see the key-value pairs stored in local storage.
It should look something like this:
Part 4.2: Loading State from Local Storage
If you refresh the page, you will notice that your tasks are still saved in local storage, but they are not being loaded back into the tasks state when the page is refreshed.
To fix this, instead of initializing the tasks state to an empty array, initialize it to the tasks stored in local storage. If there are no tasks stored in local storage, the tasks state should be initialized to an empty array.
Make sure that you parse the data fetched from local storage setting the state.
Congratulations! You have now built a fully functional todo list that persists tasks even when the page is refreshed.