7. tRPC, React Query, and Next Auth
This assignment is still under construction. Please check back later for updates.
Assignment Overview
Backstory
When it comes to big family gatherings or outings with a group of friends, deciding on a restaurant or activity can be a challenging. Everyone has their own ranking of their preferences, and tabulating all of this fairly can be a chore. Therefore, you have decided to build a web application which allows you to implement ranked choice voting.
"Voters have the option to rank candidates in order of preference: first, second, third and so forth. If your first choice doesn’t have a chance to win, your ballot counts for your next choice." --fairvote.org
Assignment
As this is a backend "business logic" focused assignment, the entire frontend and database schema have more or less been implemented for you. You will implement three main features:
-
Authentication setup using Next Auth: In any voting system, it is important that people can only vote once. Therefore, we will require users to sign in with their google account so that we can verify their identity. Most of the heavy lifting is done for you, but you will need to set up the google OAuth client ID and secret.
-
tRPC API: You will use tRPC to build out the API for the voting system.
- Rooms: Creating a voting room and adding emails of the users allowed to access the room.
- Voting items: Create "candidates" or other items which can be voted on
- Votes and scoring: Keep track of each user's ranking of each candidate. Once all votes are cast, calculate the winner using ranked choice voting.
-
React Query: Once the API is built, you will use React Query to fetch the data from the API and display it on the frontend, and to submit data from the frontend.
Invariants
We are not going to perfectly design a system that can handle all edge cases (we will offer some of these as optional extensions). With that in mind, we will make the following assumptions:
Each room will be in one of three stages, "open", "voting", or "complete". You will only have to handle certain operations in each stage, and other operations will be disabled.
- The list of allowed emails will be set when the room is created, and cannot be changed.
- Voting items can only be added when the room is in the "open" stage. They can not be deleted after being created, and they can only be created in the "open" stage.
- Votes will be cast in the "voting" stage. A user will either have a ranking for all of the candidates, or no ranking at all. Users can change their votes until the room is in the "complete" stage.
- The winner will be calculated in the "complete" stage. Nothing can change about the room after this stage.
Setup
Copy and paste these commands into your terminal to create environment variables, install dependencies, create a sqlite database, and apply the schema. Make sure to run this in the root of the project to ensure the database is created in the correct location.
cp .env.example .env # Copy the example environment variables
touch ./src/server/db/db.sqlite # Create a sqlite database
bun db:push # Apply the schema to the database
bun install # Install dependencies
Part 1: Authentication
Setup a google OAuth client ID and secret for your application. This will allow users to sign in with their google account. Follow the steps below, also shown in this quick video.
- Go to the google cloud console with your berkeley gmail account. Using your berkeley account will allow anyone else with a berkeley account to use your application, without requiring any verification of your application from google.
- In the upper left hand corner, select the dropdown to create a new project.
- Name the project, and select the "Learning" folder in the berkeley.edu organization.
- Once the project is created, click "Create Credentials" and select "OAuth client ID".
- Click "Configure Consent Screen" and select Internal user type. Name the application, and provide your email address as the support email and developer contact email.
- After configuring the consent screen, click "Create Credentials" and select "OAuth client ID" again. Select "Web application".
- Under "Authorized JavaScript origins", add
http://localhost:3000and under authorized "Authorized redirect URIs" addhttp://localhost:3000/api/auth/callback/google. - Click "Create" and copy the client ID and client secret to your .env file.
- Click "Publish App" to allow any google account to log in to the application.
- Finally, generate a random secret which will be used to sign session cookies. Add this to the
NEXTAUTH_SECRETenvironment variable in your .env file.
openssl rand -base64 32 # Generate a random secret
Part 2: tRPC API
Implement the following tRPC procedures in roomRouter.ts and voteRouter.ts. Each question for parts two and three of this assignment will have a todo flag which looks like this:
// TODO: 2.1: Create Room
Each question will state which file you need to be edited to complete the question, however you can find the question quicker by doing a global search (cmd + shift + f on mac, ctrl + shift + f on windows) for the todo flag.
Running your procedures
In order to run your procedures before building out the frontend, you can visit localhost:3000/api/panel to view all implemented procedures, and run them. You should see a ui similar to the one below:
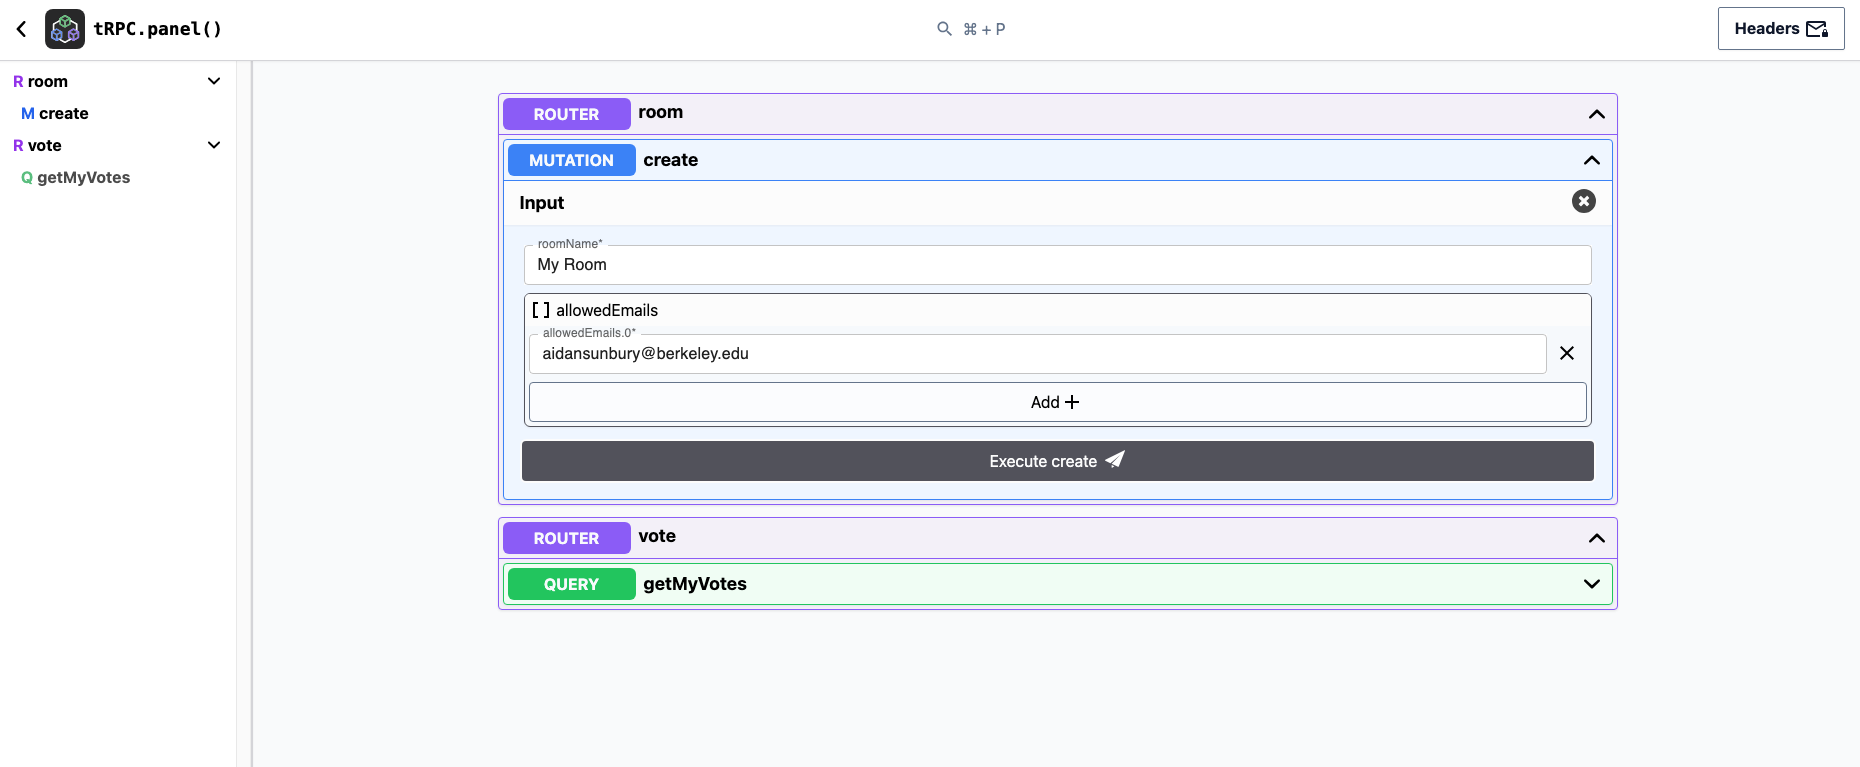
2.1: Create Room
Your first procedure is scaffolded for you. We define a protected procedure which requires the user to be signed in to create a room, pass a zod validator to the input method to validate the input, and finally indicate that the procedure will change some data on the server by using the mutation method as opposed to the query method.
import { createRoom } from "./roomValidator";
import { protectedProcedure } from "@/server/api/trpc";

  export const roomRouter = createTRPCRouter({
	create: protectedProcedure
		.input(createRoom)
		.mutation(async ({ ctx, input }) => {
			// TODO: 2.1: Create Room
		}),
});
Insert a new room into the database. Use the provided name, and add the email of the user who called the procedure to the list of allowed emails. The room should be in the "open" stage. If the room is not created successfully, throw a trpc error with code INTERNAL_SERVER_ERROR. Otherwise return the created room.
The emails are passed as an array of strings, but sqlite does not support arrays natively. As a result, store the emails in a comma separated string. Use the join method to accomplish this.
2.2: Get Room
Make a protectedProcedure the withRoom validator to create a procedure which fetches a room by its id. If the room does not exist, or the user does not have access to the room, throw a trpc error with the appropriate trpc error code. Think about which makes most sense for each scenario, and then open the dropdown below to see the correct answers.
Error Codes
If the room does not exist, throw a trpc error with code NOT_FOUND. This is equivalent to a 404 error in a REST API. If the user is not allowed to access the room, throw a trpc error with code FORBIDDEN. This is equivalent to a 403 error in a REST API.
At this point, you should be able to create a room, and then get it. Start the server with bun dev and use the tRPC panel to create a room, and then get it.
2.3: Room Middleware
If you think about the remaining procedures we need to implement, every single one will require us to first check that the user calling the procedure is allowed to access the room. Instead of repeating this logic in every procedure, we can create a middleware which will check this for us. It will work similarly to how the protectedProcedure middleware first checks that the user is signed in, and then adds the user to the context of the request.
Use the code you wrote in 2.2 to fill in the roomProcedure middleware in trpc.ts. Notice that the roomProcedure middleware starts off by calling the protectedProcedure middleware.
export const roomProcedure = protectedProcedure.use(
	// Middleware body
);
This means that all roomProcedures will also be protected procedures. Also note that we return the fetched room in the request context.
// The next function passes the request onto the "next" item in the middleware
// chain, in this case the procedure itself.
return next({
	ctx: {
		room: requestedRoom,
	},
});
After implementing the roomProcedure middleware, rewrite the get procedure to use the middleware. The procedure will infer that the room is already a part of the context based on the middleware.
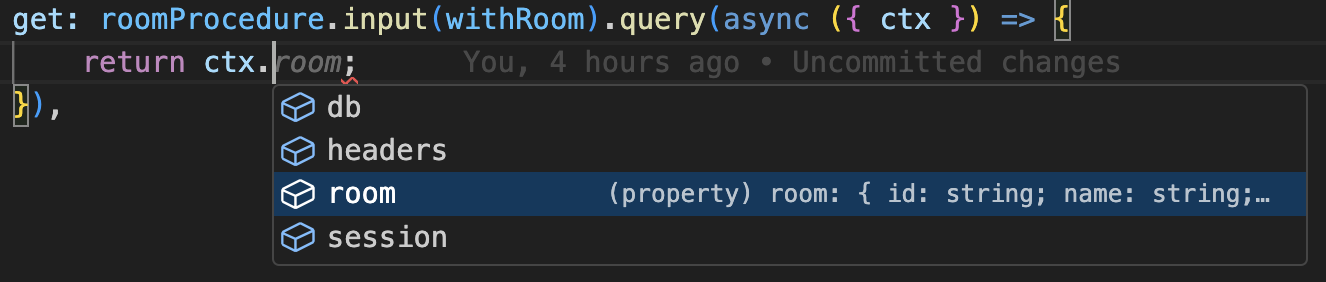
For all future procedures, use the roomProcedure middleware to check that the user is allowed to access the room.
2.4: Add Voting Item
After creating a room, the next thing we need to support is adding voting items to the room. Implement addVotingItem in voteRouter.ts, which will create a voting item with the provided input. The voting item roomId should be taken from the request context.
The input to the procedure should be all of the fields of a votingItem. We could define this zod validator manually, but it is easier and more maintainable to use drizzle zod to generate the validator programmatically from our database schema.
Additionally, we only want to allow voting items to be added when the room is in the "open" stage. If the room in the request context is not in the "open" stage, throw a trpc error with code BAD_REQUEST. If the voting item is not created successfully, throw a trpc error with code INTERNAL_SERVER_ERROR. Otherwise return the created voting item.
2.5: Get Voting Items
Implement getVotingItems in roomRouter.ts. This procedure should return all voting items for the room in the request context in any order.
You should now be able to create a room, add voting items to the room, and get the voting items for the room. Use the tRPC panel to test these procedures.
2.6: Advance Stage
Implement advanceStage in roomRouter.ts. This procedure should advance the room in the request context to the next stage. The stages are "open", "voting", and "complete". Use the provided helper nextStatus to return the next room status based on the current room status. If the room is not advanced successfully, throw a trpc error with code INTERNAL_SERVER_ERROR. Otherwise return the updated room.
2.7: Get My Votes
After the room advances to the voting stage, users will be presented with a drag and drop interface to rank the voting items. At some point, we need to create a vote for each user voting item pair in a room. We can either do this when the the room advances to the voting stage, or when the user first fetches their votes for a given room. Because not all allowed users are guaranteed to have created an account by the time the room advances (or ever), we will create with a default ordering when the user first fetches their votes. Therefore, even though server state is modified when the user first fetches their votes, we will consider this a query procedure not a mutation procedure.
- If the room is not in the voting stage, throw a trpc error with code BAD_REQUEST.
- Get all voting items for the room in the request context. Also get all of the votes cast by the user in the room in the request context. If there is one vote for each voting item, return the fetched voting items and votes. Otherwise, create a vote for each voting item, and return the voting items and votes. When creating the votes, they can have any position order.
After the votes are created or fetched, ensure that they are returned to the client sorted in ascending order by position.
There are many ways to query data, with no right or wrong answer. Unfortunately, the frontend is written in a way that expects the data in a particular format. Therefore, make sure that you use a drizzle select command instead of a drizzle query command instead, and that the data you return is of the following format.
const votesWithVotingItems: {
    vote: {
        id: string;
        userId: string;
        roomId: string;
        votingItemId: string;
        position: number;
    };
    voting_item: {
        id: string;
        name: string;
        description: string;
        roomId: string;
        createdAt: number;
    };
}[]
Hint 1
Assuming that no votes have to be created, this question can be completed with a single database call. Try selecting from the votingItem table, and left joining the vote table on the votingItemId and userId.
Hint 2 (if you are completely stuck)
If you are completely blocked on the initial database query, this query will give you the data you need. After fetching this data, make sure that the vote is defined for each voting item, and if not, create a vote for each voting item.
const userVotesAndVotingItemsForRoom = await db
	.select()
	.from(votingItem)
	.where(eq(votingItem.roomId ?? "", ctx.room.id))
	.leftJoin(
		vote,
		and(
			eq(vote.votingItemId, votingItem.id),
			eq(vote.userId, ctx.session.user.id),
		),
	)
	.orderBy(asc(vote.position));
2.8: Update My Votes
A user's ranking of the voting items within a room will be passed to the server as a ordered list of vote ids. Implement updateMyVotes in voteRouter.ts, which will set the position value of each vote to be the index it appears in the inputted array.
- Merge the provided voteIds zod validator with the withRoom validator in the request input.
- If the room is not in the voting stage, throw a trpc error with code BAD_REQUEST.
- Update and return all votes for the user in the room in the request context. The position of each vote should be the index it appears in the inputted array.
Make sure to one index (as opposed to zero index) the position, as the frontend expects the position to be one indexed.
In order for the ranking algorithm to work correctly, it is critical that we never have two votes with the same position for a given user and room. Therefore, use a transaction to ensure that no changes occur if any of the updates fail. If any of the updates fail, throw a trpc error with code INTERNAL_SERVER_ERROR. Also, fetch the voting items for the room to ensure that the user passes exactly one vote for each voting item.
2.9: Get Results
Implement getResults in roomRouter.ts, to calculate the winner.
- If the room is not in the "complete" stage, throw a trpc error with code BAD_REQUEST.
- Select all voting items for the room, and all votes for the room. Then pass these to the
calculateResultsfunction and return the result.
Congrats! You have now finished the backend for the ranked choice voting system. You should be able to create a room, add voting items to the room, advance the room to the voting stage, get your votes, update your votes, and get the results of the room. Use the tRPC panel to test these procedures.
Part 3: React Query
3.1: Create Room Mutation
Define a mutation to call api.room.create in CreateRoom.tsx. After defining the mutation hook, update the onSubmit function to call the mutation with the data from the form.
If the mutation is successful, we then want to redirect the user to the room they just created. Add an onSuccess handler to the mutation which will redirect the user to the route of the created room.
router.push(`/${createdRoomId}`);
Finally, we want to make sure we don't accidentally submit the room creation form twice while waiting for the mutation to complete. Use the isPending property of the mutation to disable the submit button while the mutation is pending.
3.2: Get Room Query
After redirecting to to the room page, we need to fetch the basic information about the room to display the name, description, and allowed emails. Replace the placeholder room object suspense query to api.room.get in src/app/[roomId]/page.tsx. Pass in the roomId from the route parameters to the query these will be covered in more detail in the NextJs part of the course.
// On a route like http://localhost:3000/2295d230-1c38-4ad5-bbde-7aac0cf994be, the roomId will be "2295d230-1c38-4ad5-bbde-7aac0cf994be"
const RoomPage = ({ params }: { params: { roomId: string } }) => {
	// component body
};